Red -- Bulgarian Army (Tsar Samuel);
Blue -- Byzantine Army (Basil II);
The Battle:--
The Byzantine Army marched from Constantinople through Komotini, Drama, and Serres and reached the Rupel Gorge on the Struma River. From there, the army entered the Strumitsa Valley and reached the vicinity of the village of Klyuch, where the river bent and approached Belasita and Ozgrazhden. There the army was stopped by a thick wooden wall, defended by Bulgarian soldiers. The Byzantines attacked the palisade immediately, but were repulsed with heavy casualties.
In response, Samuel sent a large army under one of the most able Bulgarian nobles, Nestoritsa, to strike southwards and draw the attention of Basil away from the seige at Klyuch. Nestoritsa's Bulgarians reached Thessolonica, but Byzantine troops under Theophylact Botaneiates, the strategos (Governor General) of the city and his son Mihail managed to defeat them outside the city in a bloody battle. Theophylact captured many soldiers and a large quantity of military equipment and then marched North to join Basil at Klyuch.
Basil's first attempt to overwhelm the defenders of the pass was unsuccessful and his army was unable to pass through the valley, which was defended by 15,000 -- 20,000 Bulgarians. Despite the difficulties the Byzantine Emperor did not abandon the attack. He ordered his general Nicephorus Xiphias to manuver his troops around the high Belasitsa mountain and surround the Bulgarians, while he continued assaults on the wall. Xiphias led his troops along a steep path that led him to the Bulgarian's rear. On July 29, Xiphias attacked the guards trapping them in the valley. The Bulgarian soldiers abandoned their towers to face this new threat and Basil was able to break through the front line and destroy the wall.
In the confusion of the rout, thousands of Bulgarian soldiers were killed and the remainder desperately attempted to flee eastwards. Samuel and his son Gabriel Radomir immediately headed to the East from their headquarters in the Strumitsa fortress to aid their army, but in the desperate fighting near the village of Mokrievo (present day Republic of Macedonia) they were overwhelmed by the quickly advancing enemy. Many Bulgarian soldiers were killed at Morievo and many more were captured. Emperor Samuel himself barely escaped, only breaking free through the bravery of his son, who mounted his father on his own horse and took him to safety in Prilep. From Prilep, Samuel returned to Prespa, while Gabriel Radomir headed towards Strumitsa to continue the struggle.
Monday, September 24, 2012
Battle of Manzikert, Map #3 of 3
5. Emperor orders army to withdraw in order;
6. Right wing troops panic and flee the field;
7. Left wing troops withdraw in order until attacked in rear by Seljuks (8);
8. Seljuk left wing troops attack withdrawing Byzantine Left (7);
9. Byzantine Reserve withdraws and abandons the main army;
10. Main Seljuk troops surround the imperial center.
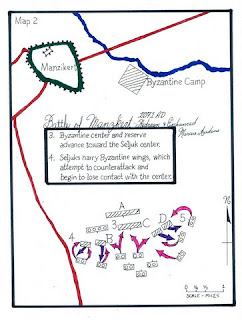
Battle of Manzikert, Map #2 of 3
3. Byzantine Center and reserve advance toward the Seljuk center;
4. Seljuks harry Byzantine Wings, which attempt to counterattack and begin to lose contact with the center.
4. Seljuks harry Byzantine Wings, which attempt to counterattack and begin to lose contact with the center.
Battle of Manzikert, Map #1 of 3
A. Byzantine second line and reserve -- Andronicus;
B. Byzantine first line first line right -- Andronicus;
C. Byzantine first line Center -- Romanos Diogenes;
D.Byzantine first line Left -- Bryennios;
1. Initial Byzantine Advance;
2. Sejuks attack and withdraw, harrying Byzantine Forces with archers.
Subscribe to:
Posts (Atom)


